
Hazy Forest News
Getting Started
Leveling
Guides
Useful Links
- Kafra KR (Market History)
- Divine Pride (Database)
- RagDoram (Database)
- Criatura Academy (kROZ)
Hazy Forest News
Getting Started
Leveling
Guides
Useful Links

OGH:CM has a selectable difficulty system where you can unlock stronger versions of the instance after completing an easier version of the instance.

| Difficulty Level | Number of Clears | Phantom Amdarais HP |
|---|---|---|
| Lv 1 | You start at Lv 1 | 600,000,000 |
| Lv 2 | 5 times | 750,000,000 |
| Lv 3 | 11 times | 900,000,000 |
| Lv 4 | 18 times | 1,050,000,000 |
| Lv 5 | 26 times | 1,200,000,000 |
| Lv 6 | 35 times | 1,350,000,000 |
| Lv 7 | 45 times | 1,500,000,000 |
| Lv 8 | 60 times | 1,650,000,000 |
| Lv 9 | 80 times | 1,800,000,000 |
| Lv 10 | 100 times | 2,000,000,000 |
Higher difficulty levels will do the following:
Note:

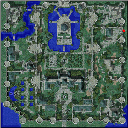
Upon entering the instance, you start at the orange spot. You will see Oscar (오스카) NPC. The party leader must talk to the NPC to initiate the battle. All party members will be randomly split to the left side (blue box) and right (green box) of the map. There are 50 monsters per side. You must clear 47 monsters in order to unlock the portal (yellow). If the other side is not cleared, the portal will lead you to the other side. You can have your support party members not move and they will be safe until you finish clearing your side.
After defeating one side of monsters, there is a chance that Oscar will announce the following message: “뭔가 기분 나쁜 녀석이 중앙통로에 나타났군요”. A Prime Corruption Root will spawn in the center corridor and you must kill it within 30 seconds. If you fail to kill it on time, the Prime Corruption Root will kill all party members on screen (15×15) and then Oscar will purify it (defeat it for you). The amount of Prime Corruption Root spawned depends on the difficulty level. Two or more can spawn at difficulty level 4 while up to five can spawn at difficulty level 10. In order to have an opportunity in defeating the Prime Corruption Root, both sides must be cleared simultaneously so that the party can reach the center corridor in time. Alternatively, the party can entirely avoid the monster without any penalties other than less rewards from Oscar.
Once both sides has been cleared, the portal will lead to the center corridor where you will meet with Oscar who will lead you to battle against Phantom Amdarais.
There is a 5% ~ 10% chance that instead of Phantom Amdarais, players would battle against Phantom Himmelmez. Some Skills & Mechanics may differ and you would have the opportunity to get her card.
General Recommendations:
 Golden Syrups - Bring plenty of them.
Note:
| Mechanic | Difficulty Level | Description | Image |
|---|---|---|---|
| Party Counter | Lv 1 or Higher | Before selecting the difficulty level, Oscar will record how many players are currently inside the instance. If any party member logs out, dies, or enters the instance late, the MVP will only take 1 damage for all attacks. This effect go away when all party members are alive again. | {{}} |
| Restart | Lv 1 or Higher | If all party members are dead for more than 5 minutes, the MVP will despawn and Oscar appear again. You can summon the MVP again by talking to Oscar. | {{}} |
| Fighting Arena | Lv 1 or Higher | If the MVP moves away from the center fighting arena, Oscar will announce that the MVP must be brought back to the arena within 30 seconds or the battle will restart. Players must be within  Grand Darkness
(Grid) mechanic. Grand Darkness
(Grid) mechanic. | {{}} |
| Health Regeneration | Lv 1 or Higher | The MVP heals passively (300,000 * Difficulty Level) HP every 2 seconds. | {{}} |
| Damaged Healing | Lv 1 or Higher | After dealing damage, the MVP will heal a portion of the damage (~60%) it received approximately 1 second later. (Need More Information) | {{}} |
| Random Party Teleport | Lv 1 or Higher | When the MVP receives a large amount of damage in a short amount of time, it will randomly teleport all party members within the Fighting Arena. The threshold value for this to occur will depend on difficulty level. | {{}} |
 Firewall
(X Pattern) Firewall
(X Pattern) | Lv 1 or Higher | Spawns firewall in an incremental pattern that will push you very far away. It can be nullified by  Land Protector
. Land Protector
. | {{}} |
 Ground Drive
(Ver. 1) Ground Drive
(Ver. 1) | Lv 1 or Higher | Casts Heaven's Drive on the center of the MVP and spreads incrementally in a (+) pattern. It can be nullified by Land Protector
. | {{}} |
| Ground Drive
(Ver. 2) | Lv 1 or Higher | Casts Heaven's Drive on the center of the MVP, then around MVP in a square pattern, followed by a spread incrementally in a (+) pattern. It can be nullified by Land Protector
. | {{}} |
 Immune Property Immune Property
| Lv 1 or Higher | For 30 seconds, MVP receives elemental immunity (physical and magical) to a particular element and display a Chinese Character above its head. The MVP will always choose its elemental weakness. Phantom Amdarais will choose Holy Immunity. Phantom Himmelmez will choose Shadow Immunity. You can use  Dispell
or Dispell
or  Clearance
to remove this effect from the MVP. Clearance
to remove this effect from the MVP. Alternatively, players can switch to a neutral element. | {{}} |
| Grand Darkness
(Grid) | Lv 1 or Higher | When the MVP is below 90% HP, a grid of Mutated Thorn will appear on the map. After 5 seconds, all surviving Mutated Thorn will hide and cast Dark Grand Cross for 10 seconds. Bathory card will assist in surviving. You can kill the Mutated Thorn so they do not cast Grand Darkness. It is best to stay in the middle of the 4 Mutated Thorns in order to avoid getting hit. | {{}} |
| Grand Darkness
| Lv 1 or Higher | Phantom Amdarais Exclusive Skill. The MVP will cast Shadow Property version of Grand Cross that will follow him around.  Bathory Card will nullify this damage. Bathory Card will nullify this damage. | {{}} |
 Grand Cross Grand Cross
| Lv 1 or Higher | Phantom Himmelmez Exclusive Skill. The MVP will cast Holy Property Grand Cross that will follow her around.  Angeling Card may help but players will take more damage during the Grand Darkness
(Grid) mechanic. Angeling Card may help but players will take more damage during the Grand Darkness
(Grid) mechanic. | {{}} |
 Rain of Meteor Rain of Meteor
| Lv 1 or Higher | Lands fire property meteor (magical damage) on the center of the MVP and spreads incrementally in either a (x) or (+) pattern. It can be nullified by Land Protector
. | {{}} |
 Demonic Hell Judgement Demonic Hell Judgement
| Lv 1 or Higher | A 1 second cast time skill with a 13×13 area of effect with a warning red tile on the floor. This skill deals physical damage (defense-piercing and dark property) and inflicts a random status effect. The damage is either melee or range depending on how close you are to the MVP. | {{}} |
 Ganbantein
(Lv 9) Ganbantein
(Lv 9) | Lv 1 or Higher | Instantly removes all ground spells in a 9×9 area on the center of the MVP. This skill can remove Land Protector
. | {{}} |
 Shield Reflect Shield Reflect
| Lv 1 or Higher | A skill that reflects a portion of all melee physical damage back to the user. You can use Dispell
,  Empty Shadow
, or Empty Shadow
, or  Golden X. Golden X. | {{}} |
 Change Undead Change Undead
| Lv 1 or Higher | Phantom Amdarais Exclusive Skill. Changes the MVP elemental property from Shadow to Undead. This can be ignored if you are using Holy element. | {{}} |
 Change Darkness Change Darkness
| Lv 1 or Higher | Phantom Himmelmez Exclusive Skill. Changes the MVP elemental property from Holy to Shadow. You should change your element to Holy when you see your damage reduced. | {{}} |
| Spawn Mutated Khalitzburg | Lv 1 or Higher | When the MVP is below 70% HP, it will spawn Mutated Khalitzburg. | {{}} |
| Spawn Mutated White Knight | Lv 1 or Higher | When the MVP is below 50% HP, it will spawn Mutated White Knight. | {{}} |
| Spawn Mutated Raydric Archer | Lv 1 or Higher | When the MVP is below 30% HP, it will spawn Mutated Raydric Archer. | {{}} |
 Max Pain Max Pain
| Lv 3 or Higher | Occurs when the MVP is below 70% Health. This skill will change the MVP into a golden color that will keep track of all damage the MVP receives and returns the damage proportionally to all players on the screen. The best method is to stop damaging the MVP when the first Mutated Khalitzburg spawns and time the skill. Phantom Amdarais's Max Pain has a 10 second duration with a 30 second cooldown which gives players a 20 second window for damaging. Alternatively, players can use Empty Shadow
or  Dark Claw
to remove it. Dispell
nor Golden X does not work. Dark Claw
to remove it. Dispell
nor Golden X does not work. | {{}} |
| Grim Reaper | Lv 3 or Higher | Reaper Yanku spawns as an NPC and will slowly walk to the MVP. When it reaches the MVP, the Health Regeneration mechanic reduces by 50,000 HP per 2 seconds while its attack will increase. This effect can stack. | {{}} |
 Gradual Gravity Gradual Gravity
| Lv 9 or Higher | Casts a debuff that reduces your HP by a certain percentage of your max HP per second. This effect can kill you. The best counter to this is to constantly use potions. | {{}} |
| Circle Arena | Lv 9 or Higher | A blue circle effect will appear randomly in the Fighting Arena. Within 1 minute, players must lure the MVP inside of this circle. If not, the MVP will gain enrage and deal more damage. (Need More Information) | {{}} |
After defeating Phantom Amdarais, a treasure chest NPC spawns in the middle. When you click on it, temporal items will drop on the floor. The amount of rewards scales with difficulty level.
| Reward Item | Difficulty Level | |||||||||
|---|---|---|---|---|---|---|---|---|---|---|
| Lv 1 | Lv 2 | Lv 3 | Lv 4 | Lv 5 | Lv 6 | Lv 7 | Lv 8 | Lv 9 | Lv 10 | |
 Sealed Temporal Circlet Sealed Temporal Circlet | 1~5 | 1~6 | 2~7 | 2~8 | 3~9 | 3~10 | 4~10 | 4~10 | 5~10 | 5~10 |
 Temporal Gemstone Temporal Gemstone | 0 | 0 | 1~3 | 1~4 | 1~4 | 1~5 | 2~5 | 2~6 | 2~6 | 2~7 |
 Temporal Spell Temporal Spell | 0 | 0 | 0 | 0 | 1~3 | 3~7 | 5~11 | 8~16 | 11~22 | 14~28 |
 Temporal Fragment Temporal Fragment | 1~15 | 1~20 | 1~25 | 1~30 | 2~30 | 2~30 | 3~30 | 3~30 | 4~30 | 4~30 |
In addition, each party member will receive
The NPC will give 1
Regarding general monster drops:
Temporal Fragment. Temporal Gemstone. Sealed Temporal Circlet.You can exchange your rewards for items and weapons.
| Item | Exchange | NPC | Location |
|---|---|---|---|
| Temporal Circlet Headgear | Sealed Temporal Circlet 5 |  HUGINN2001 HUGINN2001 | |
| Sealed Conversion Reward | Sealed Temporal Circlet 1 |
||
 Mutated White Knight Card Mutated White Knight Card | Temporal Spell 50 |
||
 Mutated Khalitzburg Card Mutated Khalitzburg Card | Temporal Spell 70 |
||
| Royal / Guardian Weapons (random) | Temporal Gemstone 2 Temporal Fragment 20 |  MUNINN2003 MUNINN2003 | |
| Royal / Guardian Weapons (selectable) | Temporal Spell 10 |
When you exchange 1
During Glast Heim Challenge Mode Event, the chances of acquiring
| Conversion Reward | Chance |
|---|---|
| 4 Temporal Fragment | 78.93% |
| 8 Temporal Fragment | 11.28% |
| 12 Temporal Fragment | 1.42% |
| 16 Temporal Fragment | 0.41% |
| 1 Temporal Gemstone | 5.87% |
| 2 Temporal Gemstone | 1.35% |
| 3 Temporal Gemstone | 0.34% |
| 4 Temporal Gemstone | 0.07% |
| 1 Temporal Spell | 0.20% |
| 2 Temporal Spell | 0.07% |
| 3 Temporal Spell | 0.07% |
| 4 Temporal Spell | 0.01% |

Talk to NPC OSC0005 to enchant your Temporal Circlet.
During Glast Heim Challenge Mode Event, all enchantment costs are reduced by 50%.
Probability percentages are approximated, extrapolated and rounded based on large sample size of user gathered trials.
If you receive Unyielding, Mettle, Affection, Adamantine, Master Archer, Magic Essence or Acute on the third enchant, it can be leveled in a similar fashion to Bio5 Headgears.
| Level Upgrade | Temporal Spell Required |
|---|---|
| Lv1 → Lv2 | 4 |
| Lv2 → Lv3 | 6 |
| Lv3 → Lv4 | 8 |
| Lv4 → Lv5 | 10 |
| Lv5 → Lv6 | 12 |
| Lv6 → Lv7 | 16 |
| Lv7 → Lv8 | 20 |
| Lv8 → Lv9 | 28 |
| Lv9 → Lv10 | 40 |
Note:
You can reset the headgear (all enchants at once, not selectable) with two options:
 Nyangvine Fruit - 100% Success.
Sources:
https://ro.gnjoy.com/news/update/View.asp?seq=237
https://ro.gnjoy.com/news/notice/View.asp?seq=7372
https://www.inven.co.kr/board/ro/1951/4706
https://www.inven.co.kr/board/ro/1951/4715
https://www.inven.co.kr/board/ro/1951/4985
https://www.inven.co.kr/board/ro/1952/274973
https://www.inven.co.kr/board/ro/1952/275925
https://www.inven.co.kr/board/ro/1952/288653
https://www.inven.co.kr/board/ro/1952/301816
https://www.divine-pride.net/forum/index.php?/topic/3318-kro-mvp-bosses-adjustment/
https://www.divine-pride.net/forum/index.php?/topic/3879-kro-glast-heim-challenge-mode-enchant/


